고정 헤더 영역
상세 컨텐츠
본문
회원가입 후
(1) 유저 정보 입력 (2) 부부 정보 입력
2가지 작업을 마쳐야 홈 화면에 진입할 수 있다.
아래와 같이 프론트앤드 코드에서는
입력이 필요한 값들이 입력되었는지 여부에 따라 status를 결정하고
status값을 기준으로 화면 전환을 진행하고 있었다
export type LoginStatusType = 'init' | 'logged' | 'authed' | 'coded' | 'complete';

const [status, setStatus] = useState<LoginStatusType>('init');

if (res.data.spouseInfoAdded && res.data.spouseConnected && res.data.authenticated) {
    setStatus('complete');
} else if (!res.data.spouseInfoAdded && res.data.spouseConnected && res.data.authenticated) {
    setStatus('coded');
} else if (!res.data.spouseInfoAdded && !res.data.spouseConnected && res.data.authenticated) {
    setStatus('authed');
} else if (!res.data.spouseInfoAdded && !res.data.spouseConnected && !res.data.authenticated) {
    setStatus('logged');
} else {
    setStatus('init');
}


useEffect(() => {
    console.log(status);
    if (status === 'complete') {
        router.replace('/main');
    } else if (status === 'coded') {
        router.replace('/user/marry/info');
    } else if (status === 'authed') {
        router.replace('/user/marry/code');
    } else if (status === 'logged') {
        router.replace('/user/profile');
    } else if (status === 'init') {
        router.replace('/auth');
    }
}, [status]);
앞으로 화면 전환 정보는 서버 측에서 제공할 예정이기 때문에
제일 먼저 해당 로직을 서버로 옮기고 API와 setState 부분을 단순하게 수정하였다.
import { AppRouterInstance } from "next/dist/shared/lib/app-router-context";

export type LoginStatusType = 'init' | 'logged' | 'authed' | 'coded' | 'complete';
export const loadingActions: Record<LoginStatusType, (router: AppRouterInstance) => void> = {
  init: (router) => router.replace('/auth'),
  logged: (router) => router.replace('/user/profile'),
  authed: (router) => router.replace('/user/marry/code'),
  coded: (router) => router.replace('/user/marry/info'),
  complete: (router) => router.replace('/main'),
};
loadingActions[status as LoginStatusType](router);
또한, Context를 만들어 WebSocket연결이 필요한 화면 레이아웃에 적용하였다
"use client";
import React, { createContext, ReactNode, useContext, useState, useEffect, useRef, useCallback } from 'react';
import SockJS from 'sockjs-client';
import { Client } from '@stomp/stompjs';
import { LoginStatusType } from 'utils/loginUtils';

interface WebSocketContextType {
  status: string;
  connect: (topic: string) => void;
  disconnect: () => void;
  updateStatus: LoginStatusType  |  null;
  sendMessage: (destination: string, message: any) => void;
}

const WebSocketContext = createContext<WebSocketContextType | null>(null);

export const WebSocketProvider = ({ children }: { children: ReactNode }) => {
  const [status, setStatus] = useState<string>('INCOMPLETE');
  const [updateStatus, setUpdateStatus] = useState<LoginStatusType | null>(null);
  const socketRef = useRef<Client | null>(null); // useRef로 변경하여 상태 변경 없이 소켓을 관리

  const [reconnectAttempts, setReconnectAttempts] = useState<number>(0); // 재연결 시도 횟수

  // WebSocket 연결 함수
  const connect = useCallback((topic: string) => {

    const socketInstance = new SockJS(`${process.env.NEXT_PUBLIC_API_URL}/back/api/ws`);
    const stompClient = new Client({
      webSocketFactory: () => socketInstance,
      onConnect: () => {

        setStatus('CONNECTED');
        stompClient.subscribe(topic, (message: any) => {
          console.log(message.body)
          if (message.body) {
            try {
              setUpdateStatus(message.body);
            } catch (error) {
              console.error('Error parsing WebSocket message:', error);
            }
          }
        });
      },
      onStompError: (error) => {
        setStatus('ERROR');
        console.error('WebSocket Error: ', error);
        if (reconnectAttempts < 3) {
          // 최대 3번까지 재연결 시도
          setReconnectAttempts((prev) => prev + 1);
          setTimeout(() => {
            connect(topic); // 재연결 시도
          }, 3000);
        }
      },
    });

    stompClient.activate();
    socketRef.current = stompClient; // useRef로 소켓 객체 저장
  }, [reconnectAttempts]);

  // WebSocket 연결 해제 함수
  const disconnect = () => {
    if (socketRef.current) {
      socketRef.current.deactivate();
      socketRef.current = null;
      setStatus('DISCONNECTED');
    }
  };

  const sendMessage = (destination: string, message: any) => {
  if (socketRef.current && socketRef.current.connected) {
    socketRef.current.publish({
      destination: destination,
      body: JSON.stringify(message),
    });
  } else {
    console.error('WebSocket is not connected.');
  }
};

  return (
    <WebSocketContext.Provider value={{ status, connect, disconnect, updateStatus, sendMessage  }}>
      {children}
    </WebSocketContext.Provider>
  );
};

export const useWebSocket = () => {
  const context = useContext(WebSocketContext);
  if (!context) {
    throw new Error('useWebSocket must be used within a WebSocketProvider');
  }
  return context;
};
그리고 next.js 13버전 이상에서 서버사이드 랜더링을 하는 경우
폴더 구조와 파일 이름이 url을 결정한다
전체 페이지를 대상으로 Context나 디자인을 적용하고 싶은 경우
/app 디렉토리 에 layout이라는 파일이름으로 RootLayout을 정의하면 된다
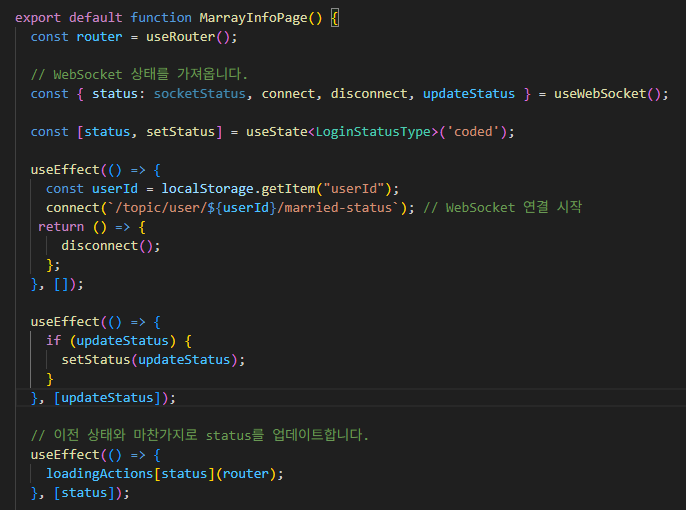
이번 경우에는 특정 페이지에만 context를 적용하기 위해
적용할 페이지가 있는 디렉토리에 layout이라는 파일 이름으로 정의하였다
페이지에 연결요청하고 해제하는 예시
728x90
'🔥Activites > [프로젝트] 진행하며 생각을 했다' 카테고리의 다른 글
| [쀼] S3에 업로드한 사진 : S3 퍼블릭 엑세스 차단 활성화(1) (1) | 2025.01.12 |
|---|---|
| [쀼] 카카오맵 API 사용하기 (0) | 2025.01.08 |
| [쀼] 화면이 실시간으로 바뀌어야 하는 요구사항을 해결해보자 (1) 백엔드 : WebSocket 구현 (0) | 2025.01.06 |
| [쀼] token 기반 인증 로직 (Interceptor에서 유효성 확인) (0) | 2025.01.04 |
| [쀼] Spring AOP 사용하여 Logging하기 (0) | 2025.01.03 |

